

Elveta real-time dongle ES32 (P1 and HAN meters) and ES3K (Kamstrup OMNIPOWER®) have a local real-time data port. When it is enabled, the dongle streams meter data directly over your own Wi-Fi network, and Home Assistant reads it using its built-in DSMR Smart Meter integration. No Elveta portal, app, or Internet connection is involved while it runs.
The dongle always sends P1 ASCII data on the local port, regardless of whether your electricity meter has a P1 port or a HAN port. The dongle reads the meter's HAN data and converts it to P1 format. That's why Home Assistant can read HAN meters, including Kamstrup OMNIPOWER®, through an Elveta real-time dongle, even though the DSMR integration can't read HAN ports directly.
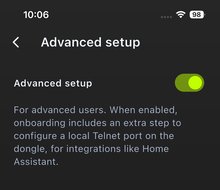
Open Elveta Connect, tap the gear icon on the start screen, and turn on Advanced setup. This adds an extra step to onboarding where you configure the local data port.
Follow Onboard With the App: power the dongle and wait for a steady blue light, scan the QR code on the label, and accept the Bluetooth pairing request.
Right after pairing, the app shows the Local data port step. Turn on Enable local data port and enter a port number, or keep the default, 2001. Make a note of the port number; you need it in Home Assistant.
Choose your 2.4 GHz Wi-Fi network and enter the password. The dongle restarts and joins your network. The port setting is stored in the dongle and is kept when it restarts.
Connect the ES32 to the meter's P1 port (RJ12) or HAN port (RJ45) with the supplied cable, or install the ES3K inside the Kamstrup OMNIPOWER® meter. See Connecting to Electricity Meters. If the meter is in a metal cabinet, see Reliable Wi-Fi From a Metal Meter Cabinet and How to Point Your Antenna.
The LED shows steady green when data is coming from the meter and Home Assistant is connected to the dongle.
Look up the dongle in your router's list of connected devices and note its IP address, for example 192.168.1.100. Create a DHCP reservation for it so the address stays the same.
In Home Assistant, go to Settings > Devices & services, select Add Integration and choose DSMR Smart Meter. Enter these settings:
| Setting | Value |
|---|---|
| Connection type | Network |
| Host | The dongle's IP address, for example 192.168.1.100 |
| Port | The port number from step 3 (default 2001) |
| DSMR version | 5S (Nordic countries), for both P1 and HAN meters. For other countries, see the Home Assistant installation guide. |
Home Assistant creates the sensors and starts updating them as the meter sends new data. If the dongle or Home Assistant restarts, Home Assistant reconnects to the dongle by itself.
Under Settings > Dashboards > Energy, add the imported energy sensor as grid consumption and the exported energy sensor as return to grid.
All data values sent from the electricity meter are presented on the local real-time data port. No values are filtered out. Exactly which values you get therefore depends on your meter and your electricity network provider. Swedish meters typically send the values below, usually every 10 seconds.
| Value | OBIS code | Unit |
|---|---|---|
| Meter date and time | 0-0:1.0.0 | - |
| Accumulated imported active energy | 1-0:1.8.0 | kWh |
| Accumulated exported active energy | 1-0:2.8.0 | kWh |
| Accumulated imported / exported reactive energy | 1-0:3.8.0 / 1-0:4.8.0 | kvarh |
| Current imported / exported active power | 1-0:1.7.0 / 1-0:2.7.0 | kW |
| Current imported / exported reactive power | 1-0:3.7.0 / 1-0:4.7.0 | kvar |
| Imported / exported active power per phase (L1, L2, L3) | 1-0:21.7.0, 41.7.0, 61.7.0 / 1-0:22.7.0, 42.7.0, 62.7.0 | kW |
| Imported / exported reactive power per phase (L1, L2, L3) | 1-0:23.7.0, 43.7.0, 63.7.0 / 1-0:24.7.0, 44.7.0, 64.7.0 | kvar |
| Voltage per phase (L1, L2, L3) | 1-0:32.7.0, 52.7.0, 72.7.0 | V |
| Current per phase (L1, L2, L3) | 1-0:31.7.0, 51.7.0, 71.7.0 | A |
Home Assistant creates sensors for the values the DSMR integration recognizes for version 5S. These include accumulated imported and exported energy, current power import and export, and voltage, current and power per phase.
To see the raw data, connect to the port from a computer on the same network, for example with nc 192.168.1.100 2001. Every telegram starts with a line beginning with / and ends with ! followed by a checksum. A shortened example (the identification line and values differ between meters):
/ELL5\253833635_A

0-0:1.0.0(261012101530W)
1-0:1.8.0(00006678.394*kWh)
1-0:2.8.0(00000000.000*kWh)
1-0:1.7.0(0001.727*kW)
1-0:2.7.0(0000.000*kW)
1-0:21.7.0(0001.023*kW)
1-0:32.7.0(0230.4*V)
1-0:31.7.0(004.4*A)
!7945
When the local data port is enabled, no electricity consumption data from the meter is sent to the Elveta cloud, and local reading keeps working even if you block the dongle's Internet access. The local data port setting is stored in the dongle, so it starts streaming again by itself after a restart, and Home Assistant reconnects automatically. The dongle keeps working when the Internet connection is lost. Internet access for the dongle is not required when local port is enabled but is strongly recommended in order to receive firmware upgrades.
More questions? See Questions & Answers or contact us.
Would you like to know more? Please contact us below.
Elveta is developed and operated by Picofrost AB. Read more at www.picofrost.com
+46 10-430 03 14
Täby, Sweden